Navigation System Setup at TQI
The navigation system must be allowed to initialize itself before use. During initialization, the system obtains the orbital information of the GPS satellites. When initialization is complete, the system can "locate" itself and function normally. To initialize the system, follow this procedure:1. Perform the normal TQI of the vehicle, including the audio system. The AUDIO button and the navigation system voice will not function if the 5-digit anti-theft code for the audio system has not been entered.
2. Enter the audio security code. The 5-digit audio security code is on a card usually found in the glove box.
TSX:
To enter the security code for the audio system, turn on the system by pressing the VOL/PWR knob. The word "code" appears on the upper display. When the TUNE knob is turned, the word "code" disappears, and a single digit is displayed. Turn the TUNE knob left or right to select each of the five digits of the audio code. When you press the TUNE knob, the system beeps and accepts each digit as it spells out the word "code" on the display. After you enter the fifth digit, the radio starts playing.
NOTE:
If the audio system anti-theft code card is lost, obtain the serial number using the instructions found in S/B 03-011, 2004 TSX: TQI and New Model Information.
TL:
To enter the security code for the audio system, turn on the system by pressing the VOL/PWR knob. The word ~ode" appears on the upper display. Enter the 5-digit security code using the radio preset buttons (1-6). As you enter each digit, the word ~ode is spelled out on the upper display a letter at a time. On the fifth digit, the radio beeps and starts playing.
NOTE:
If the audio system anti-theft code card is lost, obtain the serial number using the instructions found in S/B 03-023, 2004 TL: TQI and New Model Information.
3. Start the engine, and move the vehicle outside away from buildings and power lines. Then enter the four-digit security code for the navigation system. The code is on the navigation system anti-theft code card. When the code has been entered, the navigation system becomes operational.
4. The following instructions appear on the screen to indicate the system is initializing. Follow the on-screen instructions.
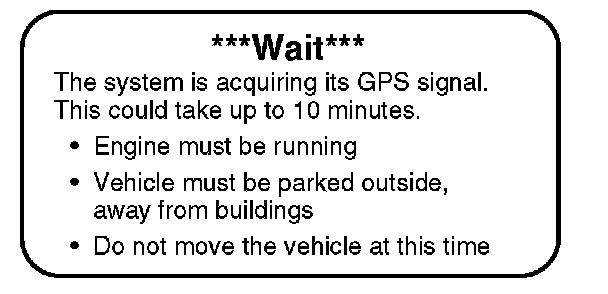
NOTE:
The average initialization takes about 10 minutes, but it can take as long as 45 minutes. When initialization is complete, the system proceeds to the globe screen.
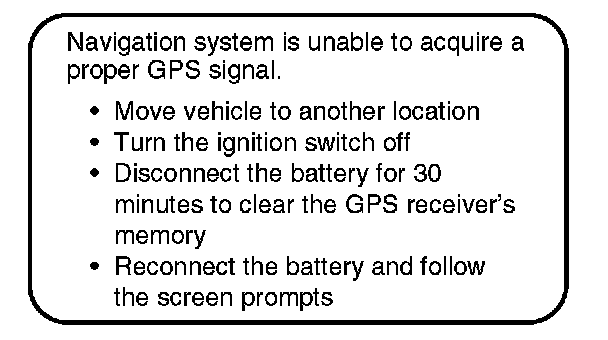
5. If the system does not initialize within 10 minutes a second screen, shown below, appears. When this screen is displayed, the system is still performing the initialization. The system does not automatically exit to the globe screen when initialization is complete. After 30 minutes, try restarting the vehicle to see if the navigation system completed the initialization. If not, follow the instructions on the screen.
NOTE:
The initialization screen may appear after battery voltage to the navigation control unit has been disconnected for more than 5 minutes. If this occurs, follow the on-screen instructions. If you are still unable to obtain GPS initialization, refer to the service manual for diagnostic information.
6. When initialization is complete, the disclaimer screen appears. Touch "OK."
NOTE:
Do not enter a destination yet. For the system to calculate a route, it must align the current location to a mapped road (map matching). This occurs when you start driving.
7. Drive the vehicle at least a half mile from your dealership, then find a safe place to park.
8. From the MAP screen, press and release the TALK button and say, "Find the nearest Acura dealer."
9. Select your dealership from the screen listings, then select "OK" on the next screen.
NOTE:
If your dealer location is not correct or needs to be changed, please report it to your District Parts and Service Manager (DPSM). To report any other data base problems, see "Reporting Errors" in the Navigation System Manual.
10. If your dealership is in a detailed coverage area, the map shows a blue highlighted route. Follow the voice guidance back to the dealership. If your dealership is not in a detailed coverage area, you may see a blue dotted "vector line" pointing to your dealership instead of the blue highlighted route. Exercise caution, and use the map to guide you back.
11. While in the MAP screen, verify that the voice control system is interfacing properly with the navigation, audio, and climate control systems.
^ Press the TALK button on the steering wheel, and say the commands, "display 1/2 mile scale" and display "current location." Press the BACK button (also on the steering wheel) to return to the map.
^ To check the audio system, press the TALK button and say "radio play," then "radio select AM" or "radio select FM 1."
^ To check the climate control system, press the TALK button and say "temperature up" and then "temperature down." Verify that the temperature displays on the audio-HVAC subdisplay located above the center vents.
12. Touch the SETUP button, or use the voice control system and say "setup." Then verify these settings by touch or with the joystick:
^ Volume set to a comfortable level
^ Display set to AUTO
^ Voice feedback set to ON
13. In Setup, touch "Delete Previous Destinations" to bring up the "Select item to delete:" menu. Select and delete any previous destinations except your dealership.
NOTE:
If this TQI is being done as part of a warranty repair, then do not delete any client information.
NOTE:
Normally the clock in the upper display is set by the GPS and does not need adjustment (this is the factory default). However, the time may need to be adjusted in some situations.
14. To adjust the time, go to Setup and touch Time Zone/Clock," then do this:
^ If you live in a state or part of a state (like Arizona or parts of Indiana) that does not observe Daylight Saving time, then set the Auto Daylight Saving Time" setting to OFF.
^ If the dealership is located very near a time zone boundary, then set the Auto Time Zone by GPS" to OFF. This allows the vehicle clock to retain the same time if the customer routinely travels back and forth across the time zone boundary.
NOTE:
Even though the time is shown in the upper display as a 12-hour clock, you need to adjust it in Setup screen # 2 as a 24-hour clock. For example, if you want to set the time in the upper display to 7:00 p.m., you need to adjust the time in the setup screen to 19:00. Remember to add 12 for any time from 1:00 p.m. to 11:59 a.m.
15. TL only: The system contains software for both the U.S. and Canada. When delivered, the system should be set up for the U.S. If the navigation disclaimer screen has an "K" and a "language" button, then the system is not set up properly for U.S. customers. To correct the setup, do this:
^ Enter the Diagnostic mode using the procedure in the service manual.
^ Select "Navi System."
^ Ensure that the ~Navi ECU" portion of the diagram reads, "Navi.ECU for U.S."
^ If it reads, Navi.ECU for Canada," touch the "Chng U.S." button, and than exit the Diagnostic mode.
16. Return to the Main menu, then clean the screen with a soft damp cloth. You may use a mild cleaner intended for eyeglasses or computer screens. Harsher chemicals may damage the screen.
NOTE:
Do not use shop towels, paper towels, or tissues; they could scratch or damage the screen.